Hyderabadi Chicken Dum Biryani is one of the easiest and simplest yet amazingly delicious and aromatic biryani recipes you will ever make at home. No fancy spices or sauteing is needed. Chicken is marinated, partially cooked rice is layered over it, and dum-cooked.
Don't miss to check out our popular and simple chicken biryani recipe.
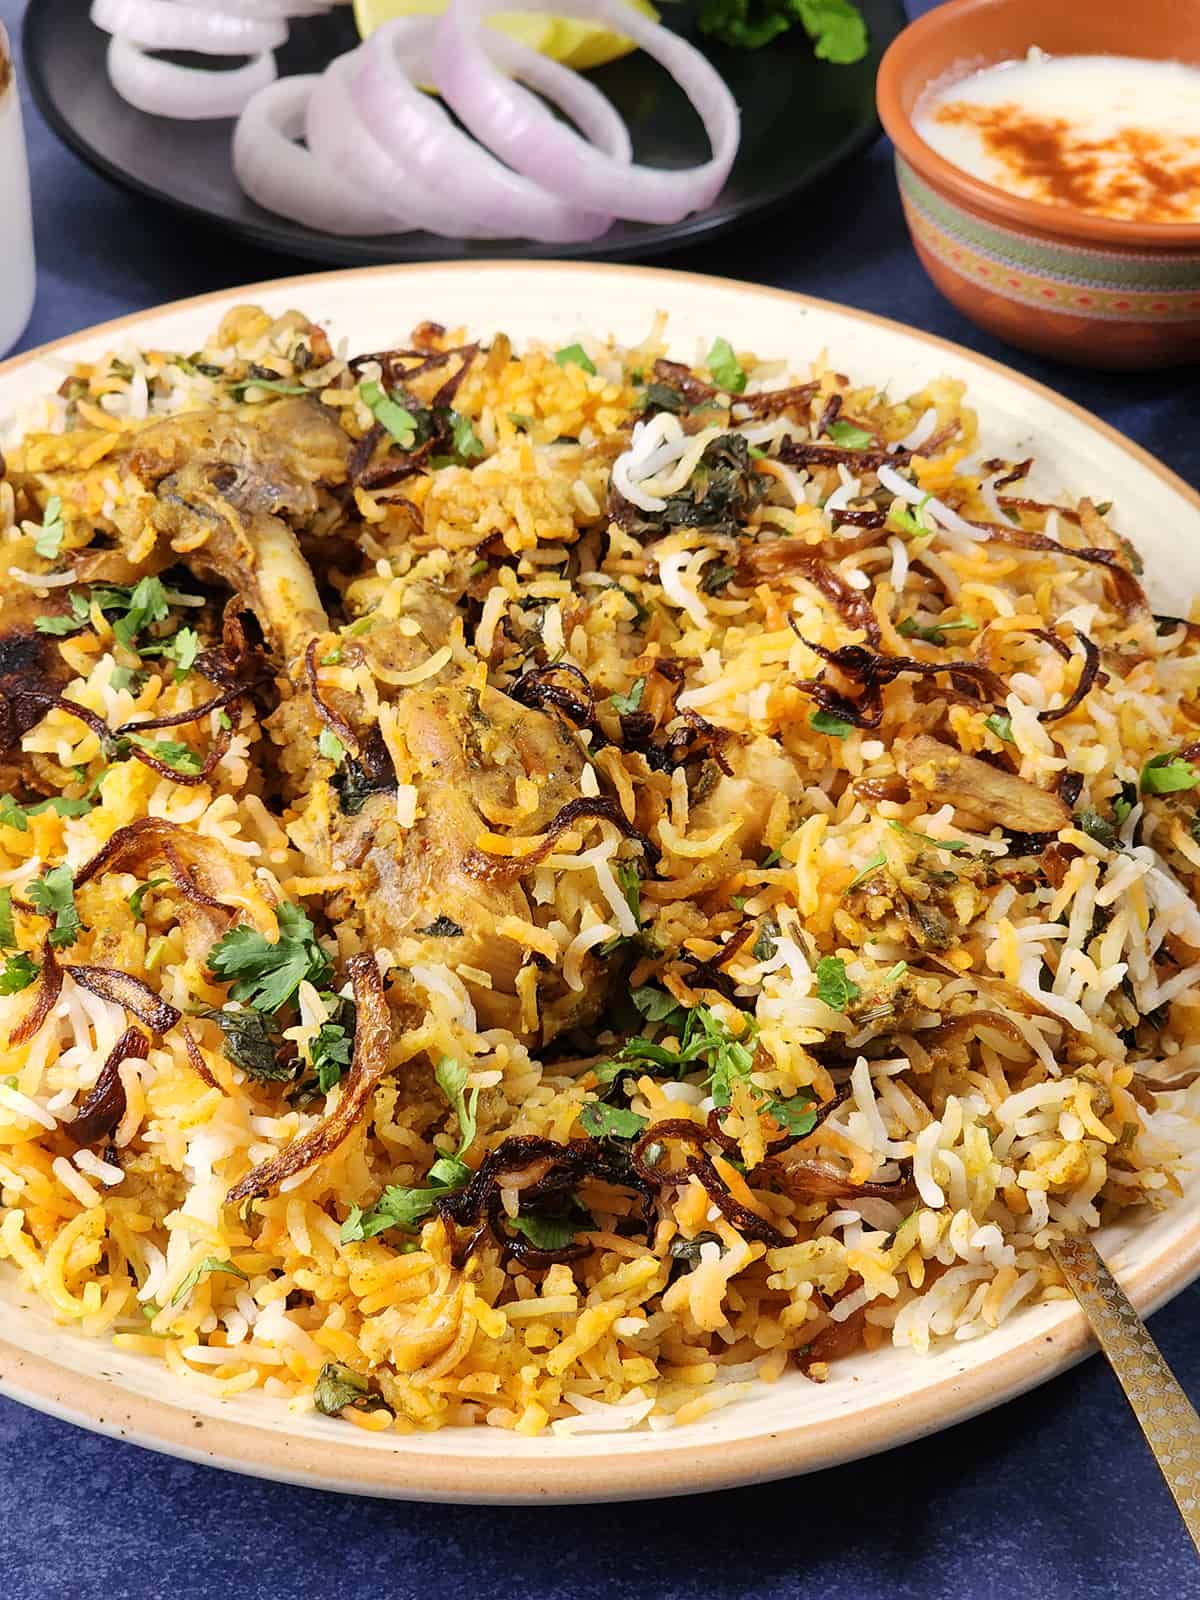
Why will you love this recipe?
- This is one of the best Hyderabadi chicken biryani I have ever tried, and it is better than any restaurant, takeout, or dhaba.
- Since no fancy spices sauteing is involved, even beginners and bachelors can easily try this biryani recipe.
- Kacchi Biryani is one of the best make-ahead dishes for Potlucks, picnics, Thanksgiving, Christmas, or any dinner party.
- I have cooked this biryani in a clay pot. You can use any thick pot of your choice.
What is Dum Biryani?
Dum means to simmer or cook on low flame. The pot you are cooking is sealed so that the pressure is created, steam is trapped, and the aroma is retained. The flavors get well combined and taste better than regular biryani.
Kacchi Biryani
Kacchi biryani is one of the popular styles of making biryani, where the partially cooked rice is layered over raw marinated meat. To make the best kachchi biryani, marinating the chicken is the key. This helps the meat to tenderize, resulting in a juicy and flavorful chicken. You can check out the video at the end, where I show how tender and juicy our dum-cooked meat was.
To make it easier, you can also have the chicken marinated and kept in the refrigerator. In this way, the flavors also get well combined.

Pot Biryani
The clay pot is also called matka, handi, or earthen pot. I have cooked the biryani today in a clay pot, and if it is readily available to you, I recommend trying biryani in that.
The low heat and the chicken cooked in their own juices and trapped enhance the dish's flavors with the pot's natural earthly aroma (matka).
Ingredients
For the marination: Chicken thighs and drumsticks with fresh ginger, garlic, green chilies, yogurt salt, and red chile powder.
For dum cooking: Fried onions (homemade or storebought), juice of lemon, oil, tandoori masala or garam masala, and a lot of fresh herbs (pudina and coriander leaves).

Step-by-step Instructions
Preparation (Making fried onions, partially cooking the rice, and marinating the chicken)
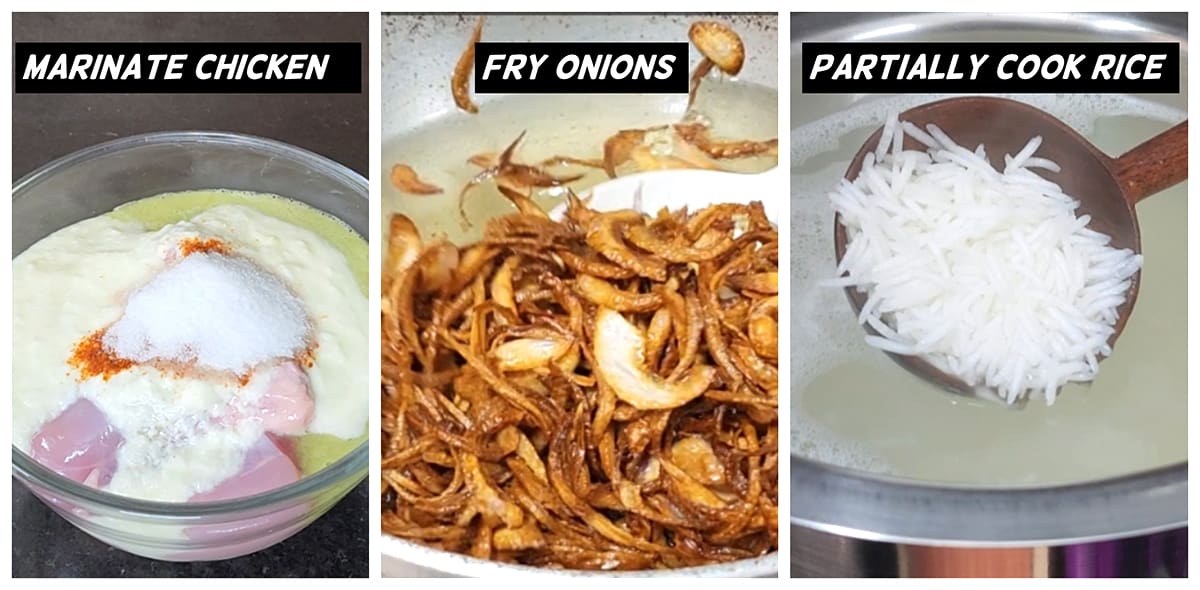
Fried onions or Birirsta
- Slice 2 medium-sized onions and separate the layers.
- Heat oil in a pan for frying. Add the sliced onions and fry them on a medium flame for a few minutes and then on low flame till it turn golden brown. It will turn crisp as it cools down.
- Make sure not to burn them. They will turn bitter. Transfer it to a paper towel to absorb excess oil.
- For the best flavor, you can use the same oil to make biryani.
Marinate the chicken
- In a blender, add garlic, ginger, and green chilies and blend it to a smooth paste.
- Add chicken thighs, garlic, ginger, green chile paste, yogurt, red chile powder, and salt and mix well to combine.
- Marinate this for atleast 30 minutes. You can refrigerate the marination overnight for the soft, tender chicken.
Partially cook the rice
- Wash the rice in water, soak for 30 minutes, and drain.
- Bring salted water to boil in a pot. Add the drained rice and cook until it is ¾th of 75 percent done.
- Drain and uncover the pot. Keep this aside.
How to make Hyderabadi chicken biryani?
- Add oil or ghee, marinated chicken, to a heavy-bottomed pan (matka / clay pot) or any pan you are comfortable cooking the biryani.

- To this add juice of 1 lemon, garam masala powder, 2 tablespoon each of mint and coriander leaves, ½ cup fried onions, and mix.
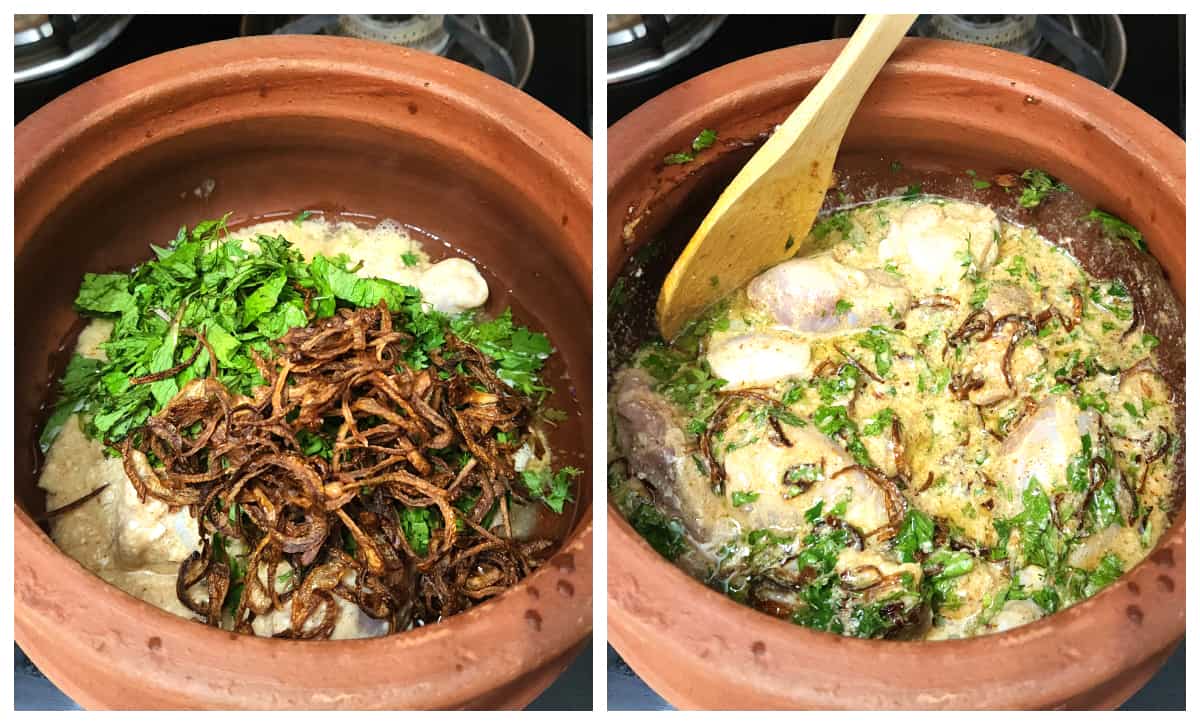
- To this, add half of the partially cooked rice and spread, top it with 1 tablespoon each of coriander leaves, mint, fried onions, and sprinkle some tandoori masala.
- Add remaining partially cooked rice, pour saffron milk and tablespoon of ghee. Sprinkle 1 tablespoon of coriander leaves, mint leaves, and fried onions, and sprinkle some tandoori masala.
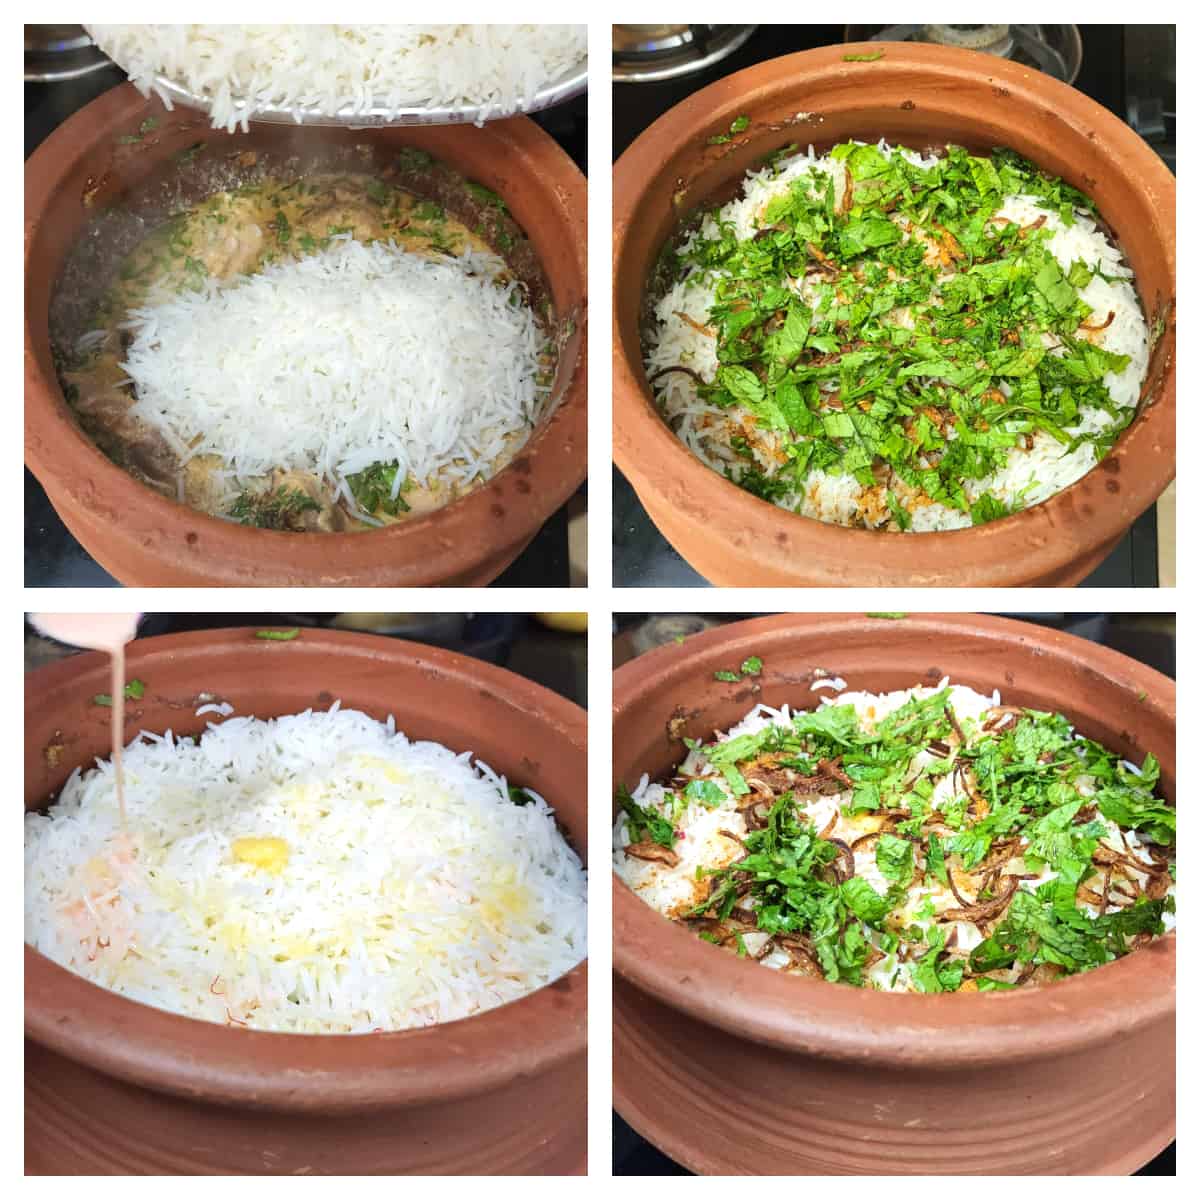
How to dum cook biryani?
Place the biryani pot over the hot tawa or griddle. Dum cook in any one method.
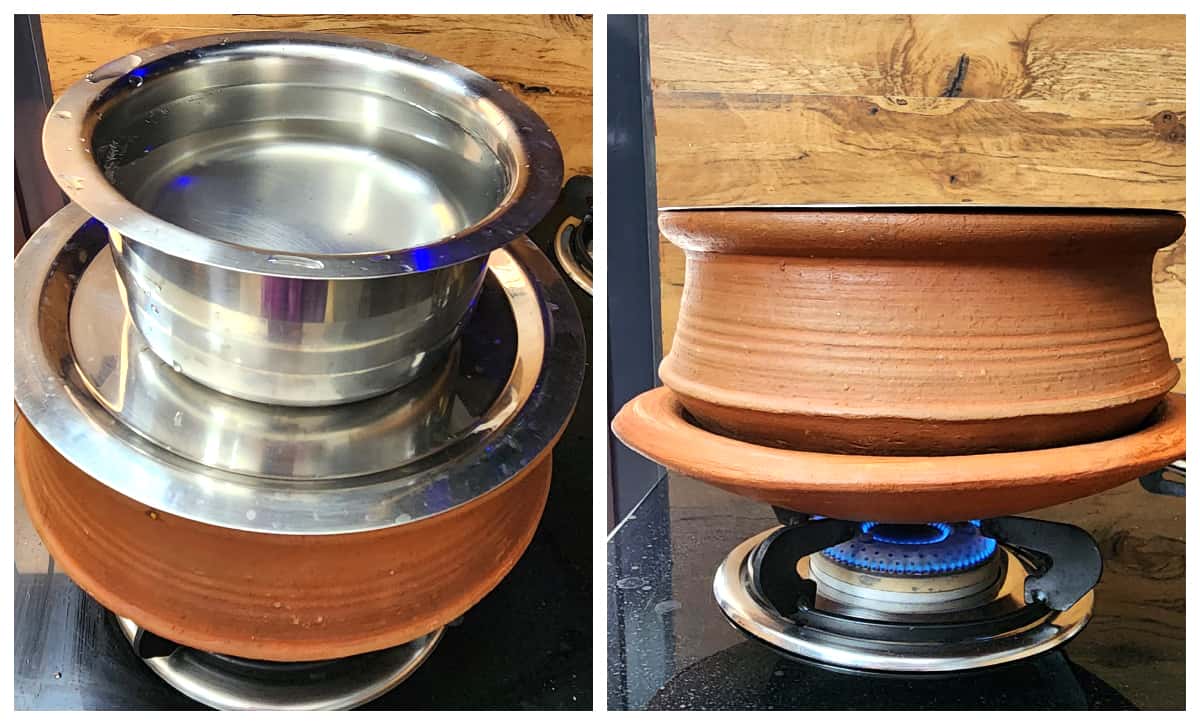
Method 1: Cover the pot with the lid and place a heavy-weight pot with water on it, as shown in the image. This is easy and serves the purpose.
- Method 2: You can make chapati or bread dough, stick it to the rim of the pot, and cover it with the lid.
- Method 3: Use aluminum foil or moist cloth to seal the rim completely and then place a heavy lid.
- Cook on medium-low flame for 15 to 20 minutes and then on low flame for 10 minutes. If you are patient, turn off the stove and let it rest for another 15 minutes. (A kitchen filled with the aroma of biryani makes you hungry)
- When done, you will see that the chicken is tender and juicy, and the rice is cooked to perfection. If you see any moisture content or the chicken is uncooked, cover and cook until it is done.

Why did my biryani burn at the bottom?
- A good quality pot is very important while making biryani. A thin pot will not work. To avoid the biryani from burning, Heat any old cast-iron tawa or clay tawa like the one shown in the picture, place a biryani pot on it, and dum cook. A non-stick pan will not work here in place of a cast-iron pan. This way, a barrier is created between the pot and the flame, and the heat gets distributed evenly.
- Always slow cook the dish and cook on dum so that no steam escapes; flavors blend well, creating the most aromatic and moist biryani.
Tips
- Like brown or charred chicken, cook your biryani on medium-high flame for the last 5 minutes. But make sure you check the chicken before doing this. Sometimes, slow cooking itself will give the brown chicken.
- Basmati rice is preferred to make biryani. But you can use any long-grain aromatic rice.
- Chicken leg quarters (thighs and drumsticks) are traditionally used to make chicken biryani.
- I have cooked the biryani in a clay pot. You can use any heavy-bottomed pan.
Bake the biryani in the oven
Layer the biryani in your casserole dish the way you do it in the pot. Bake for 30 to 40 minutes at 400 degrees F or until done. The baking time may vary based on the depth of your casserole dish.

Instant pot Hyderabadi chicken biryani
- Marinate the chicken, soak the rice, and fry the onions as mentioned in the steps given above.
- Turn on the saute mode of your IP. Once hot, add oil, marinated chicken, juice of 1 lemon, garam masala powder, 2 tablespoon each of mint and coriander leaves, ½ cup fried onions, and mix.
- Drain and add the soaked rice and spread it evenly over the chicken. Add 1 cup of water. See that all the rice is under the liquid. Close the lid of your instant pot and see that the pressure valve is in the sealing position. Select the Manual / Pressure High function and set the timer to 7 minutes.
- Let this sit for 5 minutes. Then, quickly release any remaining pressure.
- Add remaining fried onions, cilantro, and mint leaves as needed (as layers are not created in IP), along with ghee and saffron milk, and gently mix using a silicone spatula until everything is well combined.

Recipe FAQs
Hyderabadi biryani is made in the form of dum cooking with a lot of fried onions (birista) and saffron. Normal biryani uses spices like cardamom, cloves, and cinnamon, which is not used in Hyderabadi chicken dum biryani.
The secret ingredient for biryani is using a lot of fried onions and fresh herbs, and slow cooking them.
For a biryani lover like me, spicy Hyderabadi chicken biryani cooked in a clay pot packed with fried onions and fresh herbs is the tastiest one.
More Biryani Recipes
Did you like this recipe? Please leave a star ⭐️⭐️⭐️⭐️⭐️ rating below and/or a review in the comments section. You can also stay in touch with us through social media by following us on Pinterest, Facebook, Instagram, and Twitter.
Recipe card

Hyderabadi Chicken Dum Biryani Recipe | Kacchi Biryani
Ingredients
For the fried onions
- 3 Onions medium thinly sliced (or storebought fried onions)
For the chicken marination
- 400 gram Chicken thighs and drumsticks
- 1 inch Ginger
- 8 to 10 Garlic cloves
- 4 Green chilies
- ½ cup Yogurt
- 1 teaspoon Red chile powder
- 1 ½ teaspoon Salt
For dum biryani
- 1 cup Basmati rice or long-grain rice
- 3 tablespoon Oil or Ghee
- Juice of 1 lemon
- 1 tablespoon Garam masala powder or Tandoori masala + 1 teaspoon extra for layering
- 4 tablespoon Mint leaves pudina divided
- 4 tablespoon Cilantro coriander leaves divided
- ½ cup Fried onions + remaining ones for layers.
- 1 tablespoon Ghee
- 8 to 10 saffron strands or kesar soaked in 2 tablespoon warm milk
Instructions
Preparation (Making fried onions, partially cooking the rice, and marinating the chicken)
Fried onions or Birirsta
- Slice medium-sized onions and separate the layers.3 Onions
- Heat oil in a pan for frying. Add the sliced onions and fry them on a medium flame for a few minutes and then on low flame till it turn golden brown. It will turn crisp as it cools down.
- Make sure not to burn them. They will turn bitter. Transfer it to a paper towel to absorb excess oil.
- For the best flavor, you can use the same oil to make biryani.
Marinate the chicken
- In a blender, add garlic, ginger, and green chilies and blend it to a smooth paste.1 inch Ginger, 8 to 10 Garlic cloves, 4 Green chilies
- Add chicken thighs, garlic, ginger, green chile paste, yogurt, red chile powder, and salt and mix well to combine.400 gram Chicken, ½ cup Yogurt, 1 teaspoon Red chile powder, 1 ½ teaspoon Salt
- Marinate this for atleast 30 minutes. You can refrigerate the marination overnight for the soft, tender chicken.
Partially cook the rice
- Wash the rice in water, soak for 30 minutes, and drain.1 cup Basmati rice or long-grain rice
- Bring salted water to boil in a pot. Add the drained rice and cook until it is ¾th of 75 percent done.
- Drain and uncover the pot. Keep this aside.
How to make Hyderabadi chicken biryani?
- Add oil or ghee to a heavy-bottomed pan (matka / clay pot) or any pan you are comfortable cooking the biryani.3 tablespoon Oil or Ghee
- Add the marinated chicken, juice of 1 lemon, garam masala powder, 2 tablespoon each of mint and coriander leaves, ½ cup fried onions, and mix.Juice of 1 lemon, 1 tablespoon Garam masala powder, 4 tablespoon Mint leaves, 4 tablespoon Cilantro, ½ cup Fried onions
- To this, add half of the partially cooked rice and spread, top it with 1 tablespoon each of coriander leaves, mint, fried onions, and sprinkle some tandoori masala.
- Add remaining partially cooked rice, pour saffron milk and tablespoon of ghee. Sprinkle 1 tablespoon of coriander leaves, mint leaves, and fried onions, and sprinkle some tandoori masala.1 tablespoon Ghee, 8 to 10 saffron strands or kesar
How to dum cook biryani?
- Place the biryani pot over the hot tawa or griddle. Dum cook in any one method.
- Method 1: Cover the pot with the lid and place a heavy-weight pot with water on it, as shown in the image. This is easy and serves the purpose.
- Method 2: You can make chapati or bread dough, stick it to the rim of the pot, and cover it with the lid.
- Method 3: Use aluminum foil or moist cloth to seal the rim completely and then place a heavy lid.
- Cook on medium-low flame for 15 to 20 minutes and then on low flame for 10 minutes. If you are patient, turn off the stove and let it rest for another 15 minutes. (A kitchen filled with the aroma of biryani makes you hungry)
- When done, you will see that the chicken is tender and juicy, and the rice is cooked to perfection. If you see any moisture content or the chicken is uncooked, cover and cook until it is done.
Instant pot Hyderabadi chicken biryani
- Marinate the chicken, soak the rice, and fry the onions as mentioned in the steps given above.
- Turn on the saute mode of your IP. Once hot, add oil, marinated chicken, juice of 1 lemon, garam masala powder, 2 tablespoon each of mint and coriander leaves, ½ cup fried onions, and mix.
- Drain and add the soaked rice and spread it evenly over the chicken. Add 1 cup of water. See that all the rice is under the liquid. Close the lid of your instant pot and see that the pressure valve is in the sealing position. Select the Manual / Pressure High function and set the timer to 7 minutes.
- Let this sit for 5 minutes. Then, quickly release any remaining pressure.
- Add remaining fried onions, cilantro, and mint leaves as needed (as layers are not created in IP), along with ghee and saffron milk, and gently mix using a silicone spatula until everything is well combined.
Bake the biryani in the oven:
- Layer the biryani in your casserole dish the way you do it in the pot. Bake for 30 to 40 minutes at 400 degrees F or until done. The baking time may vary based on the depth of your casserole dish.
Video
Notes
- Like brown or charred chicken, cook your biryani on medium-high flame for the last 5 minutes. But make sure you check the chicken before doing this. Sometimes, slow cooking itself will give the brown chicken.
- Basmati rice is preferred to make biryani. But you can use any long-grain aromatic rice.
- Chicken leg quarters (thighs and drumsticks) are traditionally used to make chicken biryani.
- I have cooked the biryani in a clay pot. You can use any heavy-bottomed pan.
Why did my biryani burn at the bottom?
- A good quality pot is very important while making biryani. A thin pot will not work. To avoid the biryani from burning, Heat any old cast-iron tawa or clay tawa like the one shown in the picture, place a biryani pot on it, and dum cook. A non-stick pan will not work here in place of a cast-iron pan. This way, a barrier is created between the pot and the flame, and the heat gets distributed evenly.
- Always slow cook the dish and cook on dum so that no steam escapes; flavors blend well, creating the most aromatic and moist biryani.





Kristine
This dish has such a great variety of flavors and is very filling! Delicious, thank you!
Sara Welch
Enjoyed this for dinner last night and it was a savory success! Turned out easy, hearty and delicious; definitely, a new favorite recipe!
Andrea
This easy, aromatic, delicious Biryani is a perfect meal for my family. They are going to love it.
Gianne
My family and I love biryani and I've been trying to make it at home. Tried it several times but this recipe is my first successful biryani. Keeping this recipe for my meal planning rotation. Thanks
Kerri
This was a super delicious weeknight meal! Will be adding to my weekly menu!